Saturday, May 14, 2016

Teacher Quilt... Pieced by Preschoolers

For the past two years, my oldest child has been attending a wonderful Montessori preschool.  One of the teachers there is having a baby soon, so I wanted to make her a quilt (of course)!


Instead of making it entirely myself, I thought it would be more meaningful to get the children involved.


I decided simple would be best, since the kids are 3-6 and some are still learning to write their names :)


Each student was given six 5" squares, a small spool of thread, and a needle.  I cut all the squares and even drew on the 1/4" seam lines on every square.  Each family was given instructions on how to hand sew the six squares into a row using a simple running stitch.  


Instead of purchasing a cheapo spool of thread for each student, I bought a pack of bobbins and wound them with quality thread (that I already had).


As students finished their strips, I began figuring out a layout.


I decided to do simple quilting to reinforce the seams.  


I ended up adding another row of quilting stitches for extra durability.  The squares were sewn together by kids after all! I did have to redo a few strips that were sewn together poorly, and I reinforced a few without pulling them apart entirely.  But for the most part, the kids and their adult helpers did a great job!


One of the grandmothers I see often at the school is a very accomplished quilter, and she suggested having the kids sign the quilt.  She recommended this crayon and iron technique to set the ink into the fabric and it worked beautifully! I will have to follow up with the recipient in a year or so to see how it holds up over time.


I think she was very pleased with her gift!


One more thing! On Amanda's recommendation, I used this sheet set from Target as the backing for this quilt and for my Meadow Quilt.  I bought the full size for about 25 dollars and backed two quilts with it.  Quilt backings can be very expensive so I'm glad I have found a cheaper alternative.  There are many options in solids or prints.

Enjoy your weekend!

Saturday, April 23, 2016

Meadow Class and Finished Quilt Top

Back in March I had the opportunity to take Lizzy House's Meadow Quilt workshop at Intown Quilters in Atlanta, Georgia.


This is me on my way to the workshop.  I haven't taken a quilt class since my very first beginner's quilting class five years ago!  I was a little bit excited :)


Lizzy House was very approachable.  She explained every detail of the block construction and how to put the quilt together into a top.


Here's my practice block! I think it turned out great for my first one.


Lizzy and I in front of her original Meadow Quilt.

Here is the color inspiration for my version...

from here

from here

from here

 After much deliberation, I finally settled on a plan.


And then I changed it of course! I replaced the peach with a grass green color.


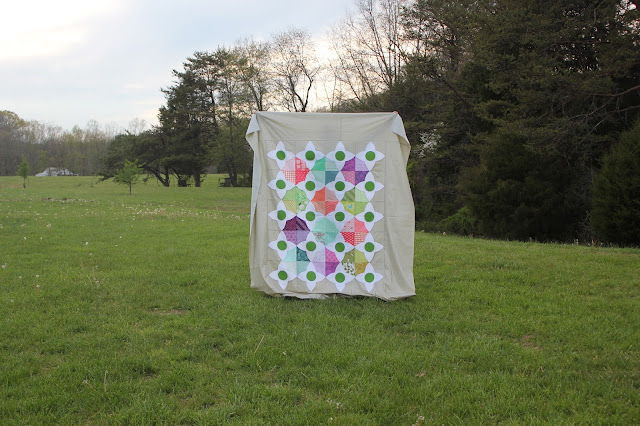
We were out at Brian's grandparents' farm the other night and I thought it would be a great time to take pictures of the finished quilt top.


I thought I would try to get a picture of my Meadow Quilt in front of a meadow!


It's about 72" by 84".


I think I will try a combination of machine quilting and hand quilting on this one.  I want to hand quilt the white petals and green eyes, and machine quilt the rest. I've never hand quilted a large quilt, and this could be a good way to get my feet wet.  


I couldn't resist one random pic of the kids enjoying their time at Happiness Hills Farm :)

Thanks for stopping by!

Sunday, March 27, 2016

Easter Dress... Times Three!

It's been a while since we've had a good family photo.  I thought Easter would be an ideal opportunity.  Then I decided to make dresses for the girls... and me!


For Rose and Bridget, I used Made by Rae's Geranium Dress pattern.  I have been wanting to get this pattern for a while.  I held off for so long because I already have a very similar dress pattern (Brownie Goose's Lazy Susan Dress).  However, the Lazy Susan dress is so difficult to get on and off! The back of the dress doesn't open up enough.  So I splurged on the new pattern and some fabric (Happy Home collection by Sew Caroline).  Rose helped pick out the fabric (from Quilter's Square) and chose the buttons (Hobby Lobby) all by herself.


Rose just turned 5 and the size 5 fit her perfectly.  She has cap sleeves on her dress.


Bridget is about 21 months, and was measuring small (size 12-18 months).  I decided to make the size 18-24 months and it also fit her perfectly, with a little bit of growing room.  Bridget has the flutter sleeve option on her dress.


I added a ribbon on Bridget and a sash for Rose to add something special to the dresses for Easter.  Rose's only complaint was that the skirt of the dress was not "spinny" enough.  Next time I might try cutting the pattern piece wider, maybe even the full width of fabric, to give it that extra fullness for great spins!

I made myself a pattern I have been looking at for a LONG time... Sew Caroline's Out and About Dress.  I have never sewn myself any garment of clothing and I have never sewn with knits.  What could go wrong!?

Well, my biggest mistake was in choosing my size.  My waist was actually measuring for the XL size.  I decided to cut a hybrid large/extra large bodice and an extra large skirt.  This ended up being way too big.  Instead of ripping out the stitches and starting over, I just cut an inch or two from each side seam and then sewed it back up.  Then the shoulders were too big, so I took the sleeves off, modified the shoulder seam, put the sleeves back on and it actually worked.  I believe it's because knit fabric is so very forgiving!


The fabric is an Art Gallery knit solid purchased from Westwood Acres. When it first arrived in the mail I was unsure that it would be thick enough for a dress, but it's perfect... not too light and not too heavy.  I can wear this in the summer with sandals and in the winter with a sweater, leggings, and boots.


I am looking forward to making this again so I can see what pattern size I should have cut out!  I might try a sleeveless version this time :)  I don't blame the pattern for my difficulties, I think it's more my lack of experience with sewing myself clothing.  For a first attempt, I'm pretty proud of how it turned out!

Wednesday, February 10, 2016

A Quilt for Me!


In five years of quilting, I have never made a large quilt for myself.  I have two wallhangings, and my kids all have quilts, but all the others I have made have been given away.

Until now! 

I bought some Alison Glass Handcrafted fabric for a mini quilt swap last year, knowing I would have plenty enough leftover to make a quilt for me. 


The pattern is called Small Plates, and it's from Elizabeth Hartman's first book, "The Practical Guide to Patchwork".  Since it's a very simple square-in-square design, I decided to make it a little bit more interesting with a color gradient effect.  Everything is better in color order! 


I love that every pattern from this book comes with instructions for a pieced back! 


I quilted it with straight lines on the diagonal, spaced about an inch apart.  I only marked once and used the guide on my walking foot to keep the lines straight and the same distance apart.


I'm very pleased with how it turned out! It's in the dryer as I type.   Finished size is 68" x 85".

I can't wait to snuggle underneath it tonight!


Saturday, January 23, 2016

Graham's Pinwheel Quilt

We got somewhere between 11 and 14 inches of snow yesterday! 


Quilting rulers are very useful for this sort of thing.


So I decided to take pictures of quilts, of course!


This was a Christmas present for my son Graham.


It's a simple pinwheel pattern and measures 48" by 64".


The backing fabric is a colorful stripe fabric given to me by a friend a number of years ago.  I pulled colors from this fabric for the quilt top.  This is another foolproof strategy for picking out colors for a quilt!


I quilted it with an allover loop-de-loop pattern.  It was my first time quilting this design and it won't be the last!


Here's a shot of the label.  Always label your quilts, people.  Always.


Enjoy your weekend, whatever the weather may be :)


Saturday, January 16, 2016

Quilt Binding - Part 3


Now it's time to sew finish the binding by hand.  I love this part of the process.  You can sew by hand on the couch watching a show or on a road trip in the car.  Quilting usually isn't very portable... except for this step!

(This is part three of the three steps in binding a quilt. Click here for part one and here for part two.)

Flip the binding over to the over side and start pinning it down.  I usually only pin down 12 or so inches at a time.


Grab your hand sewing needles.  It looks like I'm about out of mine...


Take an arm lengths' worth of thread and fold it in half.  I like to use thread that matches the neutral background on the front of my quilt or the binding fabric.


Thread that fold through the end of your needle.


Pull the folded side down (on the left in the picture below) and leave only a few inches of the other side (shown on the right in the picture below).


I sew my binding from right to left, heading clockwise around the back of the quilt. 
Insert your needle into your quilt just above your quilt binding and bring it up catching the very top fold of the quilt binding.  


 Make sure that your needle and thread never go through to the front of your quilt.  As I sew, I keep my ring finger on the other side of the quilt to feel for the needle and make sure it doesn't go through to the front.


Pull the needle and thread through until the fold at the end is about an inch away from where you inserted your needle.  Put your needle into that loop and now pull tight.


Now you are ready to take another stitch.  Insert your needle again into the quilt just above where your needle last came out.  Move it inside your quilt about a quarter inch to the left and come up out of the quilt binding right on the fold.  Keep a finger on the other side of the quilt to make sure your needle hasn't gone through to the other side.  I will often pause with my needle in the quilt (as shown below) and look at the other side of the quilt.  If you can see the needle on the front, you will see the thread when you pull it through! At this point you can back the needle out and insert it again if you need to.  When you are sure that you haven't poked through to the front, go ahead and pull your needle and thread through.


Your stitches should be almost invisible.  It gets better with practice :)  Keep going around your entire quilt, removing pins as you approach them.  When you finish a pinned section, go ahead and pin another 24 inches or so and then start hand sewing the next section.


When you get to a corner, continue folding over the binding like you have been doing.


Pull out the next side and make sure you have a crisp diagonal fold at the bottom corner.


Flip that side over for a perfect mitered corner.


Pin it in place.


Hand sew the binding up to the corner.


Remove the needle holding binding down at the corner.  When you get to the corner, make sure you pull your needle up through the bottom and side binding right at that corner.


Pull the thread tight.


And continue sewing.


To finish, make a knot in your thread.


Insert your thread as if you were making another stitch.


When you pull your needle and thread through, pull firmly to pop the knot into your quilt.


Trim your threads.


And you're done with that section.  Continue until you have hand sewn the binding all around your quilt!


Whew! You're all done!  

Oh, I almost forgot! Have you made a label? I'll do another post about labeling your quilts.  
One of these days.