Friday, January 15, 2016

Quilt Binding - Part 1

Once you've made it to the quilt binding, it means you're almost done with your quilt.  You're one step away from washing it and snuggling with it.  The binding I'm about to create here is called straight grain binding. Straight grain binding will not work for quilts with curved or scallop edges.  For going around curves you need bias binding.  That's a post for another day! 

There are three parts to binding a quilt:

1. Making the binding (covered in this post)
2. Machine sewing it to the front of your quilt
3. Hand sewing it to the back

In this post I'll cover determining how much binding you need, and how to make it.  Sewing the binding by machine and then finishing it by hand will be covered later.


First, trim the edges of your batting and backing fabric to be even with the quilt top.
  I'm using a practice quilt sandwich, by the way.  This is not an actual quilt :)


All trimmed! 


Measure the distance around your whole quilt.   This will tell you how long your binding strip needs to be.  Mine was 18+18+20+20 = 76 inches.  You will always need to add an extra 15-20 inches for the process of sewing the ends together. So now I'm up to 76+20= 96 inches.

Now, cut your binding fabric into 2.5 inch strips.  If you are cutting from yardage, assume that one strip will measure 40 inches.  So I went ahead and cut 3 strips (so I will have a total of 120 inches).  Believe me, it's way better to have extra than to not have enough.


 Now let's sew the strips together.  Sewing them at an angle will reduce the bulk of the seam allowance.  To sew the strips at an angle, lay two strips RIGHT SIDES TOGETHER with the end of one lying horizontal and the beginning of the next one vertical:


Then draw a diagonal line from top left corner to the bottom right corner. 


Sew down that line.


Trim the extra fabric with a quarter inch seam, and press it open.


Then you have a nice diagonal seam and one long fabric strip.


You can pin the strips if they are shifting as you move them to your machine. 
Repeat until all your strips are sewn together.  


Then take the long strip and fold it in half and press, so that now the strip is only 1.25" wide.


So that's how you make quilt binding!

If you're ready to sew the binding on to your quilt, click here.
For finishing the binding by hand, click here.

Tuesday, January 12, 2016

My favorite quilting tools

Having the proper quilting tools can make a big difference in how much you enjoy quilting.  It's important to have quality tools not only for precision and accuracy, but also for your safety! Here's a list of my favorite items.  I have links to these items on amazon.com, but you can also check local quilt shops, Hobby Lobby or JoAnn Fabric to compare prices (don't forget your coupons!).


Olfa Rotary Cutter - 45mm
I recommend Olfa rotary cutters.  There are multiple styles of handles, and the Olfa Splash model comes in different colors, if that's your thing.  (Yes, that's my thing.  Santa, I want the purple one for Christmas!)

Fiskars 18x24 Inch Self Healing Rotary Cutting Mat
This is the mat that I currently own.  I have also used Olfa mats, and those are high quality, too.  Make sure it says "self-healing" and that it's double sided.  Don't let your children write all over yours with a pencil.  I need to clean that off :)

Omnigrid 6-Inch-by-24-Inch Quilter's Ruler
Omnigrid 6-Inch by 12-Inch Quilter's Ruler
I have had great experiences with Omnigrid rulers.  They also have a line of rulers called Omnigrip, that are supposed to grip the fabric better for less slippage when cutting.   The other ruler shown is a Creative Grids brand, which I also love.  If you end up getting another brand, just make sure that it has lines that run the length of the ruler every 1/4".

Straight quilting pins
Here's an example of what these look like.

Dritz Quilting Curved Basting Pins Bonus Pack, Size 1, 300 Count
I have no brand preference for these, but try to get size 1 pins.

Water Soluble Marking Pen, Blue
Again, I have no brand preference here.  I just wanted you to see an example of what one looks like! This product will not show up well on dark blue, black, or purple fabrics.  If you are using those colors, you will need to get tailor's chalk or a chalk pencil instead.

Hand Sewing needles and sewing machine needles
You will need them both.  It's very important to start a project with a new sewing machine needle.

Seam Ripper
It's embarrassing how much I actually use my seam ripper.  The large one I linked to is much more ergonomic that the really small ones.  I don't know why I'm still using a small one!

Spray Starch
I love using starch on my fabric before cutting it out.  It makes the fabric nice a crisp and it makes it so much easier to cut and sew accurately.  I love Best Press and Faultless Heavy Starch.  Best Press is more expensive but comes in lots of lovely scents.  Faultless is cheaper and available at the grocery store, so that's what I use most often.

Walking Foot
A walking foot is used for straight line quilting.  It will give you much more even stitches than you would get by quilting with your regular piecing foot.  It's very important that you get one that fits your machine! The one I have linked to is a generic brand that works with Singer, Brother, and Kenmore sewing machines.  To get one guaranteed to work machine, search for (your machine brand) walking foot.

Quarter Inch Presser Foot
This isn't absolutely necessary, but it's so helpful.  Again, like with the walking foot, make sure you find one that fits your sewing machine.

permanent fabric marking pen
I use these pens on my quilt labels.  Always label your quilts, people.  Always!

As far as a sewing machine....  I say start with what you've got.  I started with a hand-me-down sewing machine that was probably only $100 when it was new.  And I made 5 or 6 beautiful quilts with it before I decided I wanted something else.  (I currently sew on a Bernina 1630).  Before you go out and purchase something new, see if anyone if your family has something sitting on a shelf they aren't using anymore.  For machine piecing and quilting, all you need is a good quality straight stitch and that tends to be where older machines shine!  Using what you have for now will give you time to learn what you really want out of a machine... and time to save up for one that meets your needs and your budget.

I hope that was helpful! New quilters, I just know you're going to love this wonderful hobby.  Experienced quilters... did I leave anything out?

Monday, January 11, 2016

Works in Progress

Last November I started a quilt.  A quilt for me!! I haven't made a quilt for me, ever! They are usually for my children, my family, friends, or a swap.  So I decided to treat myself and make a quilt for me.


It's going to be a twin size quilt, but I want it to live on our couch.  I used my favorite Alison Glass fabrics and essex linen for the neutral.  I started quilting it, but then decided I didn't like the direction it was going.  So I'm going to spend a lot of quality time with my seam ripper over the next few days. I think since this is going to be on the couch, and something I see and use very often, I want to be very pleased with the quilting.  (If you're a beginner, don't worry so much about perfection! I think it's more important to get the satisfaction of a finish!)


I have been meaning to make these cloth diaper burp cloths for a cousin expecting a baby (any day now, really!) for the last few months.  Well, I finally finished them up.


I love listening to quilting and sewing podcasts while I work!  My current favorites are The Crafty Planner and Modern Sewciety.


Finished product.  I really wish I had time to make every baby a quilt, but there's just not enough hours in the day.  This little girl will have to settle for something handmade to spit up on :)


Friday, January 8, 2016

Quilting classes are starting soon!


Simple Patchwork

My beginner quilting class that starts up in February will be making a simple patchwork quilt.  We will cut 5" squares and sew them together.  At first I resisted teaching such a simple pattern, but then I realized how many different ways there are to do simple patchwork! I have made three of these quilts myself, two in the last year.  

First is a baby quilt I made for some friends who were expecting.  Of course, I dilly-dallied at getting the quilt started and needed something fast.  


Of course, it ended up being a bit smaller than I would have liked (24" by 36").  But I'll save the topic of "how big should a baby quilt be?" for another post!  In my haste, I forgot to take a picture of the finished quilt.  Please, people, always take pictures of your quilts before you gift them!  It's just nice to capture a permanent memory of your hard work before you give it away.

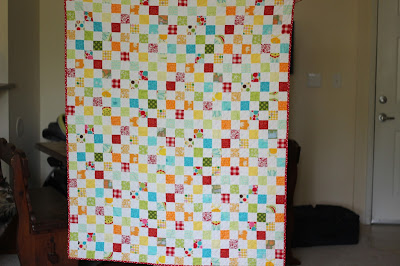
I also made a quilt for my youngest daughter in a simple patchwork squares pattern.  


My mother bought me a custom fat quarter bundle of mainly Bonnie & Camille "Ruby" fabric from fabricworm years ago.  (That fabric line is actually being reprinted!) I added a bunch of other prints and solids from my stash.


This one finished at about 42" by 52".  Like in the other quilt, I laid out the squares randomly.


I have one last quilt that uses a simple patchwork grid, but with a different arrangement.


This was a quilt I made for my first baby, before I knew what I was having.  It's just squares (lots and lots of them!) but sewn using a shortcut method.  The pattern is from Elizabeth Hartman's first book, "The Practical Guide to Patchwork".  This one uses colorful squares alternating with plain white squares for a checkerboard look.  This is another way to spice up a simple patchwork quilt!

I hope I demonstrated how versatile simple patchwork squares can be! If you want to learn how to make a simple patchwork quilt from start to finish, please contact me.  Classes are starting up in February.  I hope to see you there :)


Wednesday, December 30, 2015

One Way to Color Scheme

I wanted to show a real life example of how I use Design Seeds when planning out a quilt.  I wanted to make a half-square triangle quilt similar to this one from Debbie of A Quilter's Table.

To pick a color scheme, I searched design seeds until I found a color scheme that I fell in love with:


I couldn't find the direct link to this one on their website, so I took a screen shot from my Pinterest board!

I sat down at my computer and obsessed over figured out which solid fabrics looked closest to the image above.  I ordered the fabric online, and they all turned out pretty close.   In hindsight, that was pretty risky.  Fabrics can look very different in person from their colors on a computer screen.  In the future, I would go into a quilt shop and try to match colors.  Also, many fabric manufacturers sell a color card that has a small swatch of all their solid fabrics.  I purchased one from an instagram destash that is so very handy to have!

This is how the quilt turned out:


 I pieced the back using one leftover block and fabric from my stash.  I made a quilt sleeve using these instructions so I could hang it up on a wall.


I quilted it with a walking foot with two straight lines on either side of the straight seams.


Here is is hanging up on the wall in a hallway of my house:


Oh yes, my house has lots of wood paneling :)  Doesn't the quilt brighten up the hallway?  And doesn't the color scheme of the quilt reflect the bright and colorful inspiration image?  I used solid fabrics, but this would also work with prints.  I'll demonstrate that in a future post.

Happy sewing!

PS: The quilt was pieced by me and my friends in the South Florida Mod quilting bee! I miss you ladies!

Wednesday, December 16, 2015

Pattern Drafting

I'm getting excited about starting up another round of quilting classes.  I have taught three rounds of classes now (two of which are still wrapping up) and I absolutely love it.  I think I'm going to try teaching a new pattern. I would like something very simple, modern, and something that would work with a variety of fabrics.  What's more simple than basic squares?  


To jazz it up I think I'll show multiple ways to lay them out.  


Feedback from previous class participants said they had a tough time choosing fabrics.  So this time I will also provide more tips on choosing a color scheme.   For these sample layouts, I used my favorite color-scheme website Design Seeds.   

original image from here

The website showcases color schemes pulled from inspirational photographs.  My favorite ones are photos of the natural world (beaches, sunsets, flowers) or from cultural experiences (think Indian saris of every color, and bright doors and window shutters from some remote Mediterranean island).  Some of my favorite quilts originated from this site!  (It's a huge time waster... don't say I didn't warn you!)

All that to say, new quilting classes are starting up in February 2016 here in Berea, Kentucky! I can't wait!!!